Creating intricate snowflakes has never been easier with Procreate’s powerful tools. It’s aelso one of the easy winter illustrations you can create if you’re just getting started. By using the Symmetry Tool, you can easily design stunning snowflakes by drawing mirrored patterns. To start drawing a snowflake in Procreate, activate the Symmetry Tool from the Drawing Guide and choose the Radial option, which helps create harmonious and balanced designs.
With a few simple brushes and strokes, you can learn how to draw a snowflake and generate unique snowflake patterns while exploring Procreate’s features. The process becomes an enjoyable exploration of creativity, letting you experiment with different shapes and designs. By understanding pressure-sensitive brushes, you can refine the edges and details of your snowflake, achieving a realistic and compelling look.
Step 1: Getting Started with Procreate
To begin drawing snowflakes in Procreate, it is essential to navigate the interface efficiently, set up your canvas correctly, and select appropriate brushes. Familiarizing yourself with these initial steps will enable a smooth creative process.
Understanding the Procreate Interface
Procreate’s interface is designed for easy access to a variety of powerful tools. The main workspace consists of a large canvas area surrounded by toolbars. On the top left, you’ll find tools like the brush, smudge, and eraser. The Actionsmenu, located under the wrench icon, allows you to perform tasks such as importing images and adjusting settings.
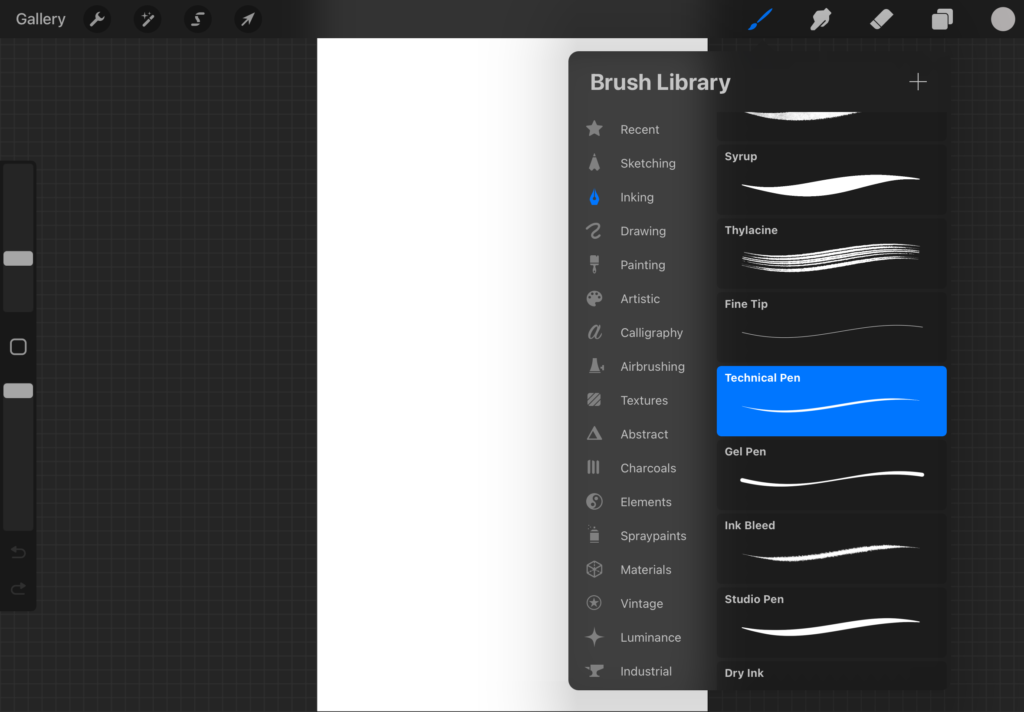
On the left side, the Brush Library contains a diverse selection of brushes. This library is highly customizable, allowing you to create unique brush sets for specific projects. Layers are essential, located on the top right, enabling you to organize your work efficiently. Familiarizing yourself with these features helps streamline your workflow and ensures you make the most of Procreate’s capabilities.
Setting Up Your Canvas
When setting up your canvas in Procreate, choosing the correct dimensions is crucial. Start by tapping the “+” icon in the gallery to create a new canvas. You can select from a range of preset sizes or customize your own. Consider whether your design is intended for digital display or print, as this will affect your choice of resolution. A higher DPI is recommended for print.
The canvas settings can also be adjusted via the Actions menu, should you need to modify settings like color profile or dimensions. Once these details are finalized, you can concentrate on bringing your snowflake to life with precision and detail.
Selecting Your Brushes
Selecting the right brushes is vital for achieving the desired effects in your snowflake design. Procreate offers a wide array of brushes, each with its own texture and feel. Explore the Brush Library to experiment with different styles, such as pen, ink, or airbrush.
You can adjust brush settings by tapping on them, customizing aspects like size, opacity, and flow. Experiment with these settings to suit your creative needs. Custom brushes can also be created or imported, enabling you to match the specific requirements of your snowflake project.
Step 2: Start with Basic Drawing Techniques
Refining your drawing techniques in Procreate enhances your ability to create detailed and symmetrical snowflakes. Focus on mastering strokes and lines, alongside crafting shapes and patterns, to transform simple designs into intricate ones.
Mastering Strokes and Lines
Begin with deliberate practice on basic strokes using the Apple Pencil. Pay attention to the pressure and angle for varying line thickness. This control over your lines is vital as it directly influences the detail and precision of your snowflake design.
Utilize the Brush Library in Procreate to explore different brush types. Experiment with brushes such as technical pen or monoline for clean and consistent strokes. Smooth and even lines contribute significantly to the overall symmetry and aesthetic.
Use the Stroke Path Settings to adjust streamlining for better control. By practicing consistency in your lines, you’ll create a more professional and polished look. Regularly assess your line work by zooming in to inspect details and make necessary adjustments.
Creating Shapes and Patterns
To start building patterns, enable the Symmetry Tool under the Canvas settings. The tool helps in creating evenly divided segments, ensuring uniformity in your design. Use Radial or Vertical symmetry modes for distinct snowflake styles.
Begin with simple geometric shapes like hexagons or circles, which form the foundation. Gradually, incorporate more intricate shapes such as triangles or teardrops to add complexity. Utilize the Shape Tool for perfect circles or straight lines.
Experiment with layering patterns using the layer functions. Adjust the opacity settings to test your patterns over each other, creating depth and intricacy without overwhelming the design. By fine-tuning shapes and patterns, your snowflake becomes uniquely beautiful and detailed.
Step 3: Design Your Snowflake

Create stunning snowflakes in Procreate by mastering symmetry and detail. Focus on understanding how snowflakes form naturally, then apply those principles to design the central structure and the intricate branches using Procreate’s tools.
Understanding Snowflake Symmetry
Snowflakes exhibit six-fold radial symmetry, meaning they have six symmetrical arms, but you can also try drawing a snowflake with eight arms if you wish. Start by selecting the symmetry tool in Procreate. This tool ensures consistency in each arm, reflecting changes across the design seamlessly. In the app, choose the rotational symmetry option to align your snowflake segments accurately. This setup allows for precise mirroring, which is crucial for achieving accurate symmetry. Adjust the settings to match the complexity you desire in your snowflake pattern. Understanding how these elements interact helps create visually balanced designs.
Drawing the Central Structure
Begin with the central hexagonal shape, which acts as the backbone for your snowflake. Use Procreate’s grid lines to maintain accuracy. This section defines the snowflake’s size and overall layout. Start by drawing a small central circle or hexagon, then extend minimal lines outward for each arm. These lines will guide the more detailed work later. The initial shape should be simple and clean, serving as the core from which all detailed structures will radiate. Make sure the proportions align with the rule of six-fold symmetry (or eight-fold symmetry if you are drawing a snowflake with eight arms).
Adding Detailed Branches
Once the central structure is complete, turn your attention to the branches extending from each arm. Snowflakes are distinguished by their complex, unique branches. Use a smaller brush size in Procreate and apply the drawing assist tool to ensure precision.
Begin adding finer lines and shapes, such as triangles and circles, to each branch. This process adds depth and texture, resembling the intricate world of real snowflakes. Experiment with different patterns to create variety and interest in your snowflake. Adjust detailing to enhance beauty and uniqueness.
Step 4: Refine Your Snowflake

If you are just up for an easy Christmas doodle, you can stop here, but you can also further improve your your snowflake designs in Procreate with effective shading, strategic use of layers, and applying intricate textures and final touches. These techniques enhance the depth and realism of your artwork, allowing for a more detailed and professional look.
Applying Shading Techniques
Shading brings depth to your snowflake. To start, choose a soft brush from Procreate’s brush library, which helps in creating subtle gradients. Adjust your brush opacity and pressure sensitivity to add delicate shadows that mimic light falling on and through the snowflake’s intricate structure.
Consider the light source. Light typically hits the raised edges of the snowflake, leaving slight shadows on the opposite side. Use layers to add shadows without altering the base design, and experiment with different blending modes such as Multiply or Soft Light for varied effects.
Using Layers for Complexity
Layers are crucial for managing intricate designs. Begin with a base layer for the main shape, then add additional layers for details like frost edges or ice crystals. By using multiple layers, you can experiment with complex designs without affecting the underlying structure.
This approach allows for easy adjustments and refinements. You can toggle layer visibility to focus on specific details, facilitating precision in your work. Organize layers into groups for different parts of the snowflake, like arms or center designs, enhancing the manageability of your project.
Adding Final Touches and Textures
Final touches are essential for realism. Procreate’s texture brushes are perfect for simulating the look of real ice and snow, adding a crispy or frosty finish. Use a fine texture brush, like Petal No. 6, to give an authentic appearance to the edges and surfaces.
Incorporate highlights to represent sparkling facets. Small, white lines or dots can mimic the light reflecting off ice. Adjust the opacity and blending modes to seamlessly integrate these elements. Finalize your piece by merging layers where necessary, ensuring all parts fit harmoniously.
Step 6: Coloring and Effects
In this section, you will explore how to bring your snowflake to life with vibrant colors and dazzling effects. The process involves selecting the right hues, creating smooth gradients, and adding subtle yet impactful glow effects.
Choosing a Color Palette
Selecting the right color palette is crucial for your snowflake design. Start with icy blues, soft whites, and silvers to create a frosty, winter feel. Consider using Procreate’s color wheel to find complementary colors that enhance your design. You may also want to explore color harmony tools that allow you to choose analogous, complementary, or triadic color schemes. Keeping your colors balanced and harmonious will ensure a visually appealing snowflake that conveys the essence of winter.
Applying Color Gradients
To add depth and dimension to your snowflake, applying color gradients is a key step. You can use Procreate’s Gradient Map feature to transition smoothly between shades. Start with lighter colors in the center and gradually move to darker tones toward the edges, simulating how light interacts with a real snowflake. Utilize the soft brush tool to blend the gradients seamlessly, ensuring there are no harsh lines between colors. Experiment with radial or linear gradients to see what best suits your design.
Adding Sparkle and Glow Effects
For a magical touch, consider adding sparkle and glow effects. Use the Add layer mode to intensify highlights and create a sense of light reflecting off the snowflake. Choose a soft, round brush with low opacity to paint gentle glimmers onto your design. You can also apply a small Gaussian blur to these areas to mimic a soft, glowing effect. For additional sparkle, use Procreate’s brush library to add scattered star-like accents. Adjusting the layer opacity will help to make these effects subtle yet striking, adding a sense of wonder to your artwork.
Bonus: Exporting and Sharing
When you’ve completed your snowflake design in Procreate, the next step is to save and share your work. This involves choosing the right format, exporting it properly, and utilizing social media platforms.
Saving Your Work
Begin by saving your artwork to ensure that no work is lost. Procreate has an autosave feature, but manually saving provides extra peace of mind. To do this, go to the Actions menu and tap on the Save option.
Consider creating multiple backups by saving in different locations. For example, save a version to your iPad’s local library and another to a cloud service like iCloud or Dropbox. This approach protects against file corruption or accidental deletion. Make it a habit to save your work periodically during the design process.
Exporting Formats and Options
Procreate offers various export options to suit different needs. Depending on your requirements, you can export files in formats like JPEG, PNG, or PSD. PNG is great for preserving transparency, while JPEG is ideal for smaller file sizes.
For further editing in applications such as Photoshop, exporting in PSD format is beneficial due to its layer retention. Access the export options through the Actions menu and navigate to Share to select your preferred format. Understanding the purpose of each format will help you choose the best option for your project.
Sharing on Social Media
Leverage the power of social media to showcase your snowflake designs. Platforms like Instagram, Pinterest, and Facebook are popular for sharing digital art. Tailor your posts by optimizing images for each platform. For instance, Instagram prefers square images, while Pinterest favors vertical ones.
Use relevant hashtags to increase visibility and engage with the art community. Procreate enables direct sharing to social media platforms through the Share menu, streamlining the process. Engage with your audience by providing insights into your design process or the tools used, and encourage feedback to foster community interaction.
Beginners Guide to Procreate
Our Beginner’s Guide to Procreate is the ultimate resource to kickstart your digital art journey. It covers everything from the basics of navigating the app to advanced techniques for creating stunning artwork so that you can not only get off to a strong start but gain confidence quickly. Dive in and unleash your creativity with Procreate!
Frequently Asked Questions for How to Draw a Snowflake in Procreate
When creating snowflake designs in Procreate, utilizing symmetry, choosing the right brushes, and effectively using layers can enhance your illustrations. Adding texture and selecting the right color palettes also play a vital role in achieving detailed and visually appealing results.